


When looking for a stove that I could pack and take on days out with the lovely people who run this website, I decided to build my own. This is partly because I like to dabble with junk in my workshop the garage, and partly so that I don't mind using it or having to repair or replace it. I stumbled on "Nimblewill Nomad's Little Dandy Wood Stove" (http://www.nimblewillnomad.com/stove.htm) from a website on stoves (http://zenstoves.net/Wood.htm). One of my criteria was for a stove that would burn wood. The idea that I need to bring fuel with me into a woodland where a source of fuel (wood) is all around me seem ludicrous. But then again, I have yet to try make a fire in the pouring rain after a few days or weeks of soaking weather.
The plans are fairly self explanatory, but I'm going to include a few pointers about things I did that didn't work and things that might make it easier for you if you want to try make one. Firstly, let me say that metalwork is not my field; I program computers and I enjoy woodturning and woodworking in my free time but I am far from professional. I can make most things reasonably strong and neat, but I don't understand metal and I lack the tools for all but the simplest of metalworking projects. Fortunately, this is a simple project.
- Hacksaw - I have a cheap (in every sense of the word) hacksaw.
- Metal file - I have a few ultra cheap (crap) files.
- Vice or clamp - I used my bench vice.
Start by downloading the PDF and printing the pages with the templates on. It helps to print both the left and right sides even though they are the same because then you know exactly how much sheet metal you'll need. I have seen people print the templates on heavy paper or card and use the cut out templates to test the assembly and this seems like a good idea. I printed mine in draft on plain copier paper.
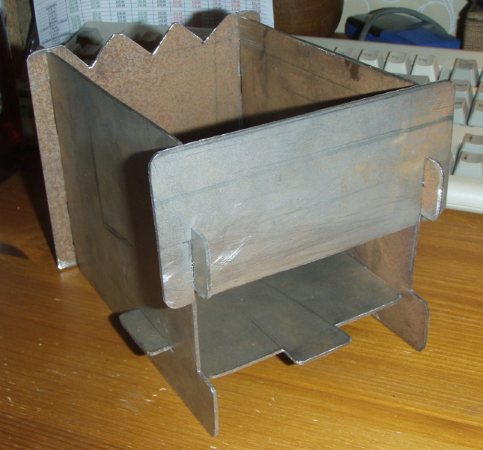
Trace the templates onto the sheet metal, or glue them on to cut the parts. Once cut out, round all the corners and file the edges and remove burrs that will cut your fingers, clothing and backpack. To cut the slots I first drilled a series of small holes and then broke through the connecting bits with a Dremel tool. This takes a lot of time to do neatly, and I suspect thinner metal sheet would make this considerably easier to do with just the Dremel tool. Test fit everything, and once happy with the assembly, ensure all the corners and edges are safe.
The stove needs the ventilation slots or holes in the sides and rear of the stove to feed the fire or the fuel will not burn effectively. I found it much easier to drill a series of holes than to cut a slot. The holes I made provide sufficient air without me needing to make them into slots.
I goofed and cut the slot for the front left slot from the bottom when it should have been from the top. I managed to cut a shallow slot from the top but the cut from the bottom will always be there now. Pay particular attention to what needs to be cut where and mark it well. This will save you ruining a piece that you have spent time getting to the right size and making safe.
I printed the plans onto A4 paper and these are the results of measuring my finished stove:
- Flat packed: 8mm x 115mm x 160mm
- Weight: Under 800 grams / 1lb 12oz (not a digital scale, only accurate to about 50g).
- Floor area inside: 95mm x 133mm
- Overall height: 113mm
- Height of floor above ground: 20mm
- Height from floor to top: 90mm
I would expect this stove to be considerably lighter when made from thinner steel. I like things strong, and it's what I had available. I would imagine the sides of an old computer case would be easier to work and lighter, but I would burn the parts in an out door fire to remove any paint or other finishes on it.
More attention to detail and making both sides the same would make assembly quicker and easier. Mine fits both ways, but only fits well one way.
I was going to make a pouch for the parts, to keep them together, but that can wait now because I found they fit in the rear pocket of a pair of old jeans I tore up for char cloth. I suspect I will make a pouch one day, but the pocket will suffice for now.


- There is a good thread in the Bushcraft UK forums: http://bit.ly/7HwVj5
- A video of fire in the stove with some notes: http://www.youtube.com/watch?v=r2bT_EizJw8


Tony
I looked on the website & it said I had to change the size of the images, but I didn't know which was the length and which was the width.
Also I couldn't get exactly 5/8 of an inch.
So I didn't want to make it from this, thanks!
I really want to make one of these. Where would I get the metal from? :)